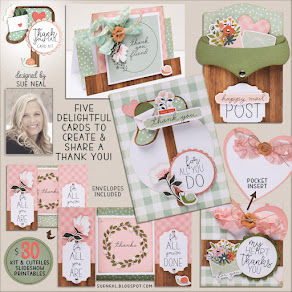
Saturday, May 18, 2013

Q's Creative Card Class: MAN CARDS II

It's all-MAN again!  It's been 3 years since my last Man Card class and I'm pretty sure we've run out!

So, stock up on these bright, bold and manly cards.  No ribbon, no lace, no buttons or flowers here.  Just big, bold shapes & patterns, fun sentiments and masculine metal charms.

Two birthday cards, a Father's Day card (that is interchangable to a thank you card) and a fun mustache thank you card!

So excited to make these with you in class, but if you don't live in Utah, I will ship to your door and you can make them in the comfort of your home (PJs & friends allowed!).  Kits are shipping now!  Just add shipping from the drop-down menu please, otherwise, I'll bring your kit to class.

Man Cards II Card Class
Digital Kit:  Almost all of my class kits are now available digitally. You will receive the slideshow and digital elements (printables) to create your own cards.  Use the drop-down menu to select.

Class Schedule:Monday, June 3rd    Sandy Hobby Lobby 2-4pm
Wed., June 5th South Jordan Hobby Lobby 10am - noon
Wed., June 5th West Jordan Senior Center 5:30 - 7:30 pm
Thurs., June 6th Orem Hobby Lobby 5:30 - 7:30 pm
Friday, June 7th Layton Hobby Lobby 10am - noon
Friday, June 7th Layton Hobby Lobby 2-4pm
Friday, June 7th Layton Hobby Lobby 5:30 - 7:30 pm
Tues., June 11th South Jordan Hobby Lobby 10am - noon
Tues., June 11th South Jordan Hobby Lobby 5:30 - 7:30 pm
Thur., June 13th American Fork Senior Center 6 - 8pm

What you'll need:
Adhesives: Your favorite tape to put cards together, as well as foam squares, dotto (or glue pen for delicate die-cuts).
Tools: Scissors and 1/8" hole punch.
Ink:  Versafine Vintage Sepia ink pad (or your favorite brown ink) with distressing sponge.
 

Saturday, May 4, 2013

Q's Creative Card Class: Tender Mercies II


As much as I love to give cards to show gratitude, send birthday wishes or celebrate a holiday, I know that the most important card I will ever give (or for that matter, receive), will be during the most difficult time in someone's life.

Three years ago I designed a class called "Tender Mercies".  Since then I've received many requests for  more sympathy cards.

I've been sold out of Tender Mercies (the first one) for some time, but was able to re-kit a very limited amount, so place your order now and I'll bring it to class, or ship it to you if you wish.


Classes start in May, but kits will start shipping April 12th.  Please add shipping from drop-down menu if you want it mailed.  This kit is pre-cut and ready to assemble and includes all digital elements (to create more cards) and a slideshow with step-by-step photos and instructions.

Tender Mercies II

Class Schedule:

Monday, May 6th    Sandy Hobby Lobby               2-4pm
Wed., May 8th       South Jordan Hobby Lobby     10am - noon 
Wed., May 8th       South Jordan Hobby Lobby     5:30 - 7:30 pm
Thurs., May 9th      Orem Hobby Lobby               5:30 - 7:30 pm
Friday, May 10th     Layton Hobby Lobby             10am - noon
Friday, May 10th     Layton Hobby Lobby             2-4pm
Friday, May 10th     Layton Hobby Lobby             5:30 - 7:30 pm
Tues., May 14th     South Jordan Hobby Lobby    10am - noon
Tues., May 14th     South Jordan Hobby Lobby    5:30 - 7:30 pm
Thur., May 16th      American Fork Senior Center  6 - 8pm

What you'll need: 

Adhesives: Your favorite tape to put cards together, as well as mini glue dots, foam squares, dotto (or glue pen for delicate die-cuts) and if you have it 1/8" foam strips (I will have some in class).
Tools: Scissors and 1/8" hole punch.
Ink:  Distress Frayed Burlap ink pad and Distress Scattered Straw Ink pad with distressing sponge.  (email me to buy from me if you can't find it).
Misc. Scattered Straw Stickles by Ranger (I will have some in class to use).

Sunday, April 14, 2013

Studio 5: Miracle Berry Recipes


*Studio 5 Video to be posted Monday Afternoon.
 
*See my Miracle Tasting Berry video (just below this one).
 
The Miracle Berry Tasting Party was a lot of fun, but after I saw this book by noted chef Homaro Cantu, I wondered if the berry had some other applications.

Despite the title of the book and how you approach weight loss, you may not think this will work for you, as some of the recipes have butter and white flour in them.

From a low-carb point of view however, there are several recipes that will work quite successfully.
 

Having been on a low-carb diet and avoiding all sugar for over 3 months now I thought this might be my solution to having my cake and eating it too.

I don't crave sugar like I used to, but it is nice to have something sweet once in awhile and I could see myself making a special dessert (especially for celebrations and holidays).  Keep in mind, every time I would indulge, I would need to eat a half-tablet of the Miracle Berry.

My first two attempts were not that successful.  Trying to make a dessert without any carbs, I made his Chocolate Walnut Torte with Coconut Crust (Page 125) for my tasting party.  My husband and I tasted this ahead of time and it was not pleasant at all!

My group of six tried this and really didn't like it.  We ate it after having tried a lot of the sweeter fruit, and we wonder if it might have tasted better had we eaten it first.  My husband and I, however, kept picking away at it, and it tasted better and better and we ate the whole thing.  The rest of the group thought we were crazy!  I also tried this torte because it saved a whopping 250 calories per serving!

My second dish, a savory dish, was coconut Shrimp with a Sweet Thai Dipping sauce (pages 68).  This definitely tasted good and sweet.

Later I tried two more recipes I thought might work better.  I made the Orange chicken (page 88) and it was delicious!  I figured that since the citrus fruit worked so well with the berry, that recipes using citrus would also work well.  These saves 125 calories per serving. 

For desert I tried the Lemon Poppy Seed Cake (page 110) and I did not like the texture, nor did I think it had much taste.

Much better was the Lemon cream cheese Eclairs.  I added Strawberries to these because they are in season and it was a lovely, sweet dessert that saved me almost 200 calories per serving (2 eclairs per serving).  I made a slight adjustment to this recipe as I felt the filling was too soft.
 
Eclair Shells

1 stick butter
1 cup water
1 cup flour
4 large eggs
1/4 tsp salt
Preheat oven to 450 degrees.  Use Silpat sheet or grease baking sheet.
In a med. saucepan combine the butter and water and bring to a boil, stirring until butter melts completely.  Turn the heat down to low and add the flour and salt, stirring until the batter leaves the sides of the pan and begins to form a stiff ball.  Remove from heat.
Add 1 egg at a time, beating until each egg is incorporated into the dough.  It's much easier to place the dough into your mixer and beat the eggs in that way.  Beat until the dough loses its shine and looks dull.
Place dough into a pastry bag fitted with a large tip.  You can also use a gallon size freezer ziplock bag and snip off one corner.
Pipe dough onto cookie sheet in 4" x 1 1/2" strips.  Bake for 15 minutes.  Turn temp down to 325 F. and bake for 20 minutes more until golden brown.  Cool completely.

 
Lemon Cream Cheese filling
16 oz. Reduced Fat Cream Cheese
1 Cup Cold heavy cream
1 Cup freshly squeezed lemon juice
1 tbsp pure vanilla
1/3 cup honey
Beat Heavy Cream in mixer until soft peaks form.  Set aside.
Beat softened cream cheese in mixer.  Add honey.  Beat until incorporated.  Add lemon juice and vanilla and mix well.  Remove from mixed and fold in whipped cream.
Cut open each eclair and spoon filling inside (you can also pipe filling through a small hole at end of eclair, but then you would need to omit the strawberries.
Place cut strawberries inside and cover with top.
Option:  To make this without using the Miracle Berry, add 3 cups Powdered sugar to filling.  I haven't done this yet, but I would try 2 cups first and go from there.  You could also use a sugar substitute like Splenda to sweeten.

Orange Chicken
 
Who would think that there is that much sugar in Orange chicken or for that matter many of the yummy Asian dishes that are sweet and sour.  Using the miracle berry and eliminating the sugar saves you 125 calories per serving.  And it was yum!
1 1/2 cups + 2 Tbsp water
2 Tbsp freshly squeezed orange juice
1/4 cup freshly squeezed lemon juice
1/3 cup rice wine vinegar
2 1/2 Tbsp soy sauce
1 Tbsp grated orange zest
1/3 cup honey
1/2 tsp minced fresh ginger
1/2 tsp minced garlic
2 Tbsp chopped green onion
1/2 tsp crushed red pepper flakes
 
2 boneless, skinless chicken breast halves, cut into 1/2" pieces
OR
1 lb boneless, skinless chicken thighs, cut into 1/2" pieces
1 cup flour
1/2 tsp. salt
1/4 tsp. ground black pepper
1/4 cup olive oil
2 Tbsp cornstarch
Combine first 11 ingredients in a saucepan over med-high heat, bring to boil, take off heat and let cool for 15 minutes.
Place chicken in ziplock bag and add 1 cup marinade into the bag.  Reserve the rest of the marinade for the sauce.  Place chicken in bag in refrigerator (in a container so it won't leak) for at least 2 hours, or up to 6 hours.
To cook, place flour, salt & pepper in shallow bowl.  Heat oil in shallow pan.  Toss chicken pieces in flour mixture and fry on med-high heat until golden brown and cooked through.  Drain pieces on a cooling rack over paper towel. 
After all the chicken is cooked, wipe out the oil and add the marinade and heat up.  Add cornstarch to a small cup with 2 Tbsp of water to make a slurry.  Add to the marinade, bring to a boil to create the sauce.    Add chicken pieces and toss carefully to coat.  Serve immediately.  Sprinkle with some fresh green onions cut on the diagonal. 
Option:  To make this without using the Miracle Berry, add 1 cup packed brown sugar to recipe.  I haven't done this yet, but I would try 1/2 cup first and go from there.  You could also use a sugar substitute like Splenda to sweeten.


Studio 5: Miracle Berry Tasting Party


*Studio 5 video to be posted Monday Afternoon.
 
**Recipes to follow this post.
 
Liven up your next dinner party or family gathering with the Miracle berry!  You will be laughing, grimacing, exclaiming and having fun!

I did this recently with just six of us...the word of the night?  "Amazing".  Nothing earth shattering here, but a playful gustatory experience.

We trust our senses for the most part, but with CGI (computer generated imagery) it's hard to know if what we see is real these days.  Smell and taste are two senses not easily manipulated, so sucking on a lemon wedge with pleasure and not puckering just seems downright impossible.

Introducing the Miracle berry.  It will do that and more!

The Miracle fruit ( a small red berry called Synsepalum Dulcificum) is native to West Africa and has been known to westerners since the 18th century.  The cause of the taste reaction is a protein called Miraculin, which binds with the taste buds and acts as a sweetness inducer when it comes in contact with acids, according to the scientist who has studied the fruit, Linda Bartoshuk at the University of Florida's Center for Smell and Taste.

Basically, anything that is inherently sour and/or bitter will taste sweet.

How to plan your party?

Purchase M Berry Tablets.  Sold on Amazon and on M Berry's website... just Google it.  There are other brands, but this one seems reliable.

Cost?  About .60 to .75 cents a serving.  The box has 10 tablets (cut in half for 20 servings) and will cost about $15 a box or less if you buy more.

The fresh berries are very perishable so the tables are the easier way to go.

Create a platter of food to experiment with.  This should include a lot of fruit.  Fruit has natural sour notes to it, so it will all taste like the best fruit you've ever tasted.  Berries, which aren't too tart will be bursting with sweetness.  Lemons will taste like lemonade.

I also included Salt & Vinegar chips and sour candy, but refer to my list of foods to try below.

It's not a bad idea to have your guests try a small amount of the tasting platter before you chew the tablet, so they can be assured they really are sour and can compare the taste.

Have guests chew their half-tablet.  Keep it in your mouth as you chew, spreading the tablet over the tongue.  It takes about 1-2 minutes for full effectiveness and will last about 30 - 45 minutes.

Start with the less sour items, first and work up to the lemon.  I would also start with the fruit and vegetables and then go to column 2.  Eat small amounts, otherwise you could end up with a tummy ache.

Foods to try:

Strawberries
Raspberries
Blackberries
Blueberries
Lemons
Grapefruit
Orange
Green apples
Pineapple
Cherries
Kiwi
Lime
Red Peppers
Tomatoes
Siracha hot sauce
Lemon juice shooter
Sour Cream
Sour Candy
Salt & Vinegar Chips
Cheeses (Goat cheese works well)
Cream cheese
Balsamic Vinegar Shooter
Warheads (Lemon candy)
Salami
Dill pickles


Many thanks to my Sister and Brother-in-law (Monte & Sand Bates) and our friends, Dana & Brad Smith for being such good sports!

Thursday, March 21, 2013

Q's Creative Cards: Tender Mercies II


As much as I love to give cards to show gratitude, send birthday wishes or celebrate a holiday, I know that the most important card I will ever give (or for that matter, receive), will be during the most difficult time in someone's life.

Three years ago I designed a class called "Tender Mercies".  Since then I've received many requests for  more sympathy cards.

I've been sold out of Tender Mercies (the first one) for some time, but was able to re-kit a very limited amount, so place your order now and I'll bring it to class, or ship it to you if you wish.


Classes start in May, but kits will start shipping April 12th.  Please add shipping from drop-down menu if you want it mailed.  This kit is pre-cut and ready to assemble and includes all digital elements (to create more cards) and a slideshow with step-by-step photos and instructions.

Tender Mercies II

Class Schedule:

Monday, May 6th    Sandy Hobby Lobby               2-4pm
Wed., May 8th       South Jordan Hobby Lobby     10am - noon 
Wed., May 8th       South Jordan Hobby Lobby     5:30 - 7:30 pm
Thurs., May 9th      Orem Hobby Lobby               5:30 - 7:30 pm
Friday, May 10th     Layton Hobby Lobby             10am - noon
Friday, May 10th     Layton Hobby Lobby             2-4pm
Friday, May 10th     Layton Hobby Lobby             5:30 - 7:30 pm
Tues., May 14th     South Jordan Hobby Lobby    10am - noon
Tues., May 14th     South Jordan Hobby Lobby    5:30 - 7:30 pm
Thur., May 16th      American Fork Senior Center  6 - 8pm

What you'll need: 

Adhesives: Your favorite tape to put cards together, as well as mini glue dots, foam squares, dotto (or glue pen for delicate die-cuts) and if you have it 1/8" foam strips (I will have some in class).
Tools: Scissors and 1/8" hole punch.
Ink:  Distress Frayed Burlap ink pad and Distress Scattered Straw Ink pad with distressing sponge.  (email me to buy from me if you can't find it).
Misc. Scattered Straw Stickles by Ranger (I will have some in class to use).

Monday, March 18, 2013

Nyan Cat Rainbow Cake please...

About six months ago my 16-year-old daughter asked me to make her a Nyan Cat Rainbow Cake for her 17th birthday in March.

Talk about planning ahead!

I, of course, had to google exactly what a Nyan Cat Rainbow cake was!

I was far too rushed to do a really good job, but Savannah was thrilled, which means I get the mom-of-the-year award in her eyes.

If you're wondering what exactly a Nyan Cat is and WHY it looks like it has a pop-tart for a body, then please go here.  I can handle approximately 2 seconds of this repetitive video/song.  But I guess it went viral a couple of years ago and all the kids know it.  Pop culture.  Go figure.

Savannah had a Sweet 17 (because she didn't do a sweet 16) party at Provo Beach club.  Savannah had to cradle that cake in the back of the car...only a few thumb prints.


I must admit, it was pretty cool cutting into that cake with all those colors!


And because we had half a cake left after her party, we decided to re-cake it for the family party the next day.  

Notice the tail sticking out of the cat?  Notice the missing tail on the picture above?  Yeah.  Made a tail and everything and forgot to put it on!  I told you I was in a rush!

So, I highly doubt any of you will be making a nyan cat cake anytime soon, however, the process of making the rainbow cake was pretty cool and everyone loved the results.

First of all, I did my favorite fake cake...yup, a box mix, plus 1 cup sour cream, 1 small box of jello pudding (I used White cake with White chocolate pudding), 3/4 cup water, 3/4 cup oil and 4 eggs.  This always gives me a quick, moist, yummy cake.


I used 4 cake mixes to make this cake, but really, I could have used 3 (for a 12" cake), I ended up having to cut off quite a bit on top.  Too much batter.

Divide the batter in 6 equal portions and add food coloring (I used gel) until you get a bright intense color.

Prepare you pan (I used parchment and butter) and pour in your darkest color first.

Pour in your 2nd color directly in the middle of the pan and repeat with your 3rd color.

This is much easier (and frankly I think it looks cool) than making separate layers of each color.

I need to try these in a cupcake at some point.  Yes, I know...all that food coloring can NOT be good for me.  But then again, neither can the cake.  

Enjoy!


Monday, March 11, 2013

Studio 5: Stroganoff Crepes


When I had a young family I often looked to a pound of hamburger for dinner.    I have quite a repertoire of hamburger recipes because I didn't want to bore my family and one of our all-time favorites, that is still requested from my adult children, is Stroganoff Crepes.

Even my daughter, who hates mushrooms will eat this without batting an eye (of course, she can't explain this sudden acceptance of mushrooms!)

 I found this recipe many years ago in a recipe book I got for my wedding.  I used to peruse and plan my meals with this and other cookbooks; this, in large part, is how I learned how to cook.  I pulled this book out when planning this segment and smiled when I saw that I had circled the recipe title and my hand written "very good".  Since then I make this from memory because that's how much I've made this recipe in the last 30 years!

Stroganoff Crepes

1 lb. hamburger
1 onion, chopped
3 cloves garlic, minced
8 oz. mushrooms, sliced (or more)
2 tsp salt
1 tsp ground pepper
2 tsp Paprika
1 Tbsp Italian seasoning
2 Tbsp Flour
1 can cream of mushroom soup
2 cups sour cream (1 1/2 cups + 1/2 cup for topping)
16-20 crepes (recipe below - double it for making these)


Directions:
1.      Sauté chopped onions in some olive oil until soft and slightly golden
2.      Add ground beef and sauté.
3.      Cook until almost cooked through.
4.      Add mushrooms to pan.
5.      Continue to cook (add more oil if getting dry, depends on the fat content of your beef)
6.      Cook until everything is browned and mushrooms are soft.
7.      Add seasoning, cook for another minute.
8.      Add 2 Tbsp Flour and mix together.
9.      Add soup.
10.  mix well.
11. Add 1 1/2 cups of sour cream.
12. Filling is ready.  Keep warm before filling, or store in fridge for later use.


Basic Savory Crepes
makes eight 8" crepes)

1 cup flour
3 eggs
1 1/2 cups milk
1/4 tsp salt
1/8 tsp ground black pepper
3 Tbsp butter, melted, plus more for cooking crepes

Whisk (or process in blender) together flour, eggs, milk and seasoning until you have a smooth batter.  Cover and refrigerate for 30 minutes or several hours. 

Melt 3 Tbsp of butter and whisk into the batter.  The batter should be the consistency of heavy cream.  If it is too thick, add a small amount of milk slowly while whisking until you achieve the right consistency.

Heat a skillet (or crepe pan) over medium heat.  Melt a little butter in pan or spray with vegetable spray.  Pour batter into pan (I use a 1/4 or 1/3 cup measuring cup) with one hand and with the other hand hold the pan and tilt and swirl the batter until it covers the entire surface (or about 8" diameter).  Crepes should be as thin as possible while still holding their shape.

Cover until batter is set and edges start to brown (about 15 seconds).  Flip over and cook for another 10 seconds.  Remove from pan and keep warm until a clean dish towel.  Continue making crepes with remaining batter, adjusting heat if necessary.

You can store crepes for 2 days in the refrigerator or freeze for several months.

You can either fill your crepes (1/4 cup of filling) and roll up (see image of 9x13 pan with rolled crepes) or fold into quarters, as shown here.

Note that these crepes in the picture are some non-carb ones we tried out (which are made with eggs and ricotta, which is why they are so yellow).

I don't recommend them...go for the carbs!  Use flour! 

Lastly, garnish the top of crepes with some more sour cream and some sautéed mushrooms.

 Enjoy!

Share it

Contact Me

Cricut Keyboard Code

Favorite Quote

"The art of being
HAPPY lies in the
POWER of extracting
happiness from
COMMON things."
~Henry Ward Beecher
 

MyEyeQ | Creative Commons Attribution- Noncommercial License | Dandy Dandilion Designed by Simply Fabulous Blogger Templates